The availability overview in the lower part of your Web Agent displays information about people's status and availability.

The amount of people you'll see in the availability overview depends on whether you've searched for someone or not. If the availability overview displays a lot of people, it may contain more than one page. In that case, you can use the buttons in the bottom part of the availability overview to move between pages.

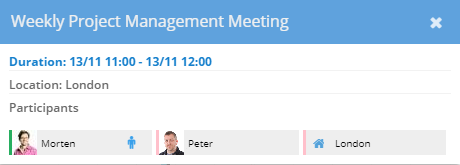
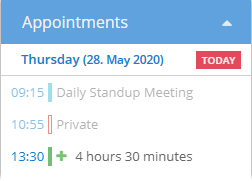
The availability overview's calendar displays people' appointments, etc.
If you can't see the calendar, place your pointer over one of the availability overview's headers, for example the Name header. Then click the small arrow, and select Columns > Calendar.
The calendar by default covers one day, but you can select a different number of days.
Colored bars in the calendar represent appointments. The length and position of a bar shows the start and end time of the appointment. The color indicates the type of appointment. Red, for example, means a private appointment. If only the outline of an appointment is colored, the person is available during the appointment.
If a user has appointments that overlap, they're displayed next to each other. If you want to view all of someone's appointments on separate rows, click ![]() next to their name.
next to their name.
To view details about an appointment, click it.
When you select someone in the availability overview, you can view several types of details about them:
-
Below the availability overview, you can view their basic details.

If you see information in strikethrough, it means that the information is confidential. You can view it, and use it yourself, but you musn't give such information to others.
In the basic details section, you can click the person's e-mail address to send them an e-mail message, for example if you need to tell them that someone called while they were away.
-
To the left of the availability overview, you can view their appointments.
-
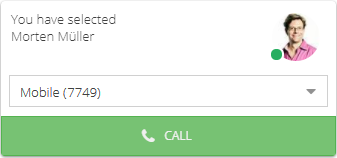
In the active calls overview, above the availability overview, you can view available ways to call them.
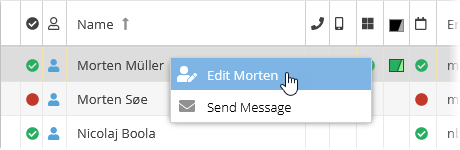
You can edit someone's details if you right-click their name in the availability overview and select Edit [name of the selected person].
You may not have the right to edit all of a person's details.
Also note the useful Send Message feature.
Use the status icons in the availability overview to see if people are available. The status icons update themselves in real-time.
Someone can have several types of status simultaneously. For example, their mobile status can be different from the line status of their desk phone, and they may have yet another status on Microsoft Teams.
You can quickly view someone's overall status with unified presence (that's the ![]() column). Unified presence is a summary of people's combined status from several sources, for example calendar, line status, mobile status, and Teams, so that you can quickly tell if they're available or not:
column). Unified presence is a summary of people's combined status from several sources, for example calendar, line status, mobile status, and Teams, so that you can quickly tell if they're available or not:
![]() The person is available
The person is available
![]() The person is busy
The person is busy
![]() The person is away
The person is away
![]() The person is offline
The person is offline
It's your administrator who defines which types of status are used for unified presence.
You can also view someone's individual types of status in their ![]() line status,
line status, ![]() mobile status, and
mobile status, and  Teams status.
To view what a specific status icon means, place your pointer over the icon.
You can sort the columns to quickly view everyone who's available. Click the column's header to sort the column.
If someone's an agent, you can view their agent status in the availability overview's ![]() agent status column. Examples:
agent status column. Examples:
 Active
![]() Wrapup (a short amount of time that agents may get after they've handled an inquiry, so that they have time to finish paperwork, etc. before they get the next inquiry)
Wrapup (a short amount of time that agents may get after they've handled an inquiry, so that they have time to finish paperwork, etc. before they get the next inquiry)
 Standby
If an agent goes offline, they don't have any agent status.
Again, you can sort the agent status column to quickly view every agent who's active, standby, etc.
You can sort most of the availability overview's columns if you click the headers.
You can also customize the availability overview so that it displays the columns that you find most important: Place your pointer over one of the availability overview's headers, for example the Name header. Then click the small arrow, select Columns, and select the information that you want in your availability overview, for example:
-
 Unified Presence: Summaries of people's overall status, typically based on their calendar, line status, mobile status, and Teams status.
It's your administrator who defines which types of status are used for unified presence.
-
 Line status: Status of people's phones.
 -
 Mobile status: Status of people's mobile phones.
 -
 Microsoft Teams status: People's Teams status.
 -
Office phone status: The status of people's office phones, for example from BroadWorks, Cisco, etc.
-
Calendar: The portion of the availability overview that contains the calendar.
This is help for Zylinc Novus. To view help for other versions, go here.
© 2021 Zylinc A/S • Disclaimer
Zylinc unified help is a UK Technical Communication Awards winner 
Help version: 26 February 2021 13:09:03
Share this topic: